Thursday, February 25, 2010

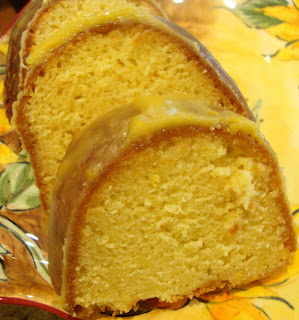
Triple Citrus Pepper Pound Cake


This will probably be the last of my citrus posts for awhile. So let's use up the rest of those oranges, lemons and limes so we can move on. Before we close this chapter though, here's a recipe for a citrusy pound cake...with a pepper kick. Not a big kick, more of a love tap, really! The citrus isn't overwhelming either, just another love tap! The pepper kick develops over time. I tasted this cake on day 1, no pepper. Day 2, ohhhh, there's the pepper!

Triple Citrus Pepper Pound Cake

1 1/2 cups cake flour
3/4 tsp. baking powder
1 1/4 tsp. freshly ground black pepper
1/4 tsp. salt
1 T. lemon zest
1 T. lime zest
1 T. orange zest
1 cup butter, softened
1 1/4 cups sugar
4 eggs, room temperature, lightly beaten

Preheat the oven to 325 F. and prepare a 9X5 loaf pan. In a medium bowl whisk together flour, baking powder, black pepper and salt. With an electric mixer, cream the butter with the citrus zests until light and fluffy, about 2 minutes. Add the sugar and beat an additional 2 minutes. With the mixer on medium low speed, pour the egg mixture into the bowl, and mix until blended. On low speed mix the flour mixture in, adding it in 4 additions. After the last addition, mix on medium speed for 30 seconds. Scrape the batter into the prepared pan and smooth the top. Bake for 60-75 minutes, until a toothpick inserts into the center comes out with only a few crumbs attached and the sides of the cake are pulling away from the sides of the pan. Let the cake cool in the pan for 5 minutes, and then invert the cake onto a cooling rack. Cool completely before slicing and serving. The pepper flavor develops over time. Wait 24 hours!

I found this recipe here: http://thespicedlife.blogspot.com/2010/02/triple-citrus-black-pepper-pound-cake.html (Closely adapted from Cake Keeper Cakes, Lauren Chattman)

Thanks for visiting!

Microwave Marmalade

You can make marmalade for breakfast. Yes you can! It's amazing! I have made orange, lemon and lime marmalade with this recipe. It's so QUICK! I am so impressed. I have had better marmalades, but they weren't made in 15 minutes from the citrus in my backyard. This recipe is a winner.

The original recipe was found here
http://www.putsup.com/2010/01/microwave-meyer-lemon-marmalade.html

Notes from original recipe:
Do not double the recipe, the microwave will not like it and you will end up with a giant mess.
Use a high-sided microwaveable container (I used an 8 cup Pyrex measuring cup) to microwave the marmalade
After you get the basic technique down, play a bit...add a touch of booze or spice!

Microwave Marmalade
Thinly sliced zest (with no white stuff) from 1 lb of citrus
3/4 lb citrus (all peel, white rind and seeds removed)--tangerines, lemons, limes, oranges or combination
1 1/4 cup white sugar
1-tablespoon rum (optional) (I used Cointreau)
½ teaspoon freshly grated nutmeg (optional)

Peel and seed fruit, removing and discarding all the whit pith, and white stringy bits from the outside and down the center of the fruit. Weigh the peeled fruit and removed zest, you'll need 3/4 lb. of pulp and zest. Place zest, pulp and sugar in the bowl of a food processor. Puree, making sure all the peel and section skins are reduced to a pulp. Pour pureed mixture into a high-sided microwaveable bowl, adding optional alcohol and nutmeg. Cover tightly with plastic wrap pierced a few times to vent. Microwave on high for 5 minutes. Stir; remove platic wrap and return to microwave for 7 minutes. Remove, stir and check thickness. At this point, depending on the juiciness of your fruit (oranges mainly), return mixture to the microwave for another 2-3 minutes. Marmalade will thicken as it cools. Makes 2 cups. Keep in refrigerator for up to three weeks. Can be frozen for longer storage.

Thanks for visiting!

Wednesday, February 24, 2010

Coconut-Lime Shrimp Bisque (in 20 minutes)

It's cold and raining here in California. Surprisingly cold. Soup weather cold. But it's Tuesday at 6PM. I'm in the grocery store, hungry, and wanting soup for dinner. Do I grab a can? Noooo...those cans do NOT contain "soup"! The contents of those cans have a soup LOOK and when warmed they have soup TEXTURE, but they really don't have any taste. Look and texture can fool some people to think the can contents have taste, but they don't. Oh dear, I got on my processed food rampage, didn't I? So sorry. To make a long story short...this soup is one of my favorites. Once you have all the ingredients it can be on the table in less than 20 minutes, and it tastes d-i-v-i-n-e. Don't be scared of the ingredients, trust me and try it! My 15 month old grandson slurped up his bowl and then whined until he got to have some of mine. This is one soup where the broth is probably more yummy than the shrimp! Can you imagine? BTW, don't use Jumbo Shrimp, they are too big for one bite and don't fit on the spoons. You can make this with all shrimp, or half shrimp and fish, or use scallops or half scallops and half shrimp or half fish...it's all good.

Coconut-Lime Shrimp Bisque

1 T. olive oil
5 chopped shallots (about 3/4 cup)
1 T. minced fresh ginger
1 tsp. ground turmeric
1/4 tsp. ground cumin
8 oz. bottle Clam Juice (In a pinch, can sub chicken broth, or a can of clams with the juice)
14.5 oz. can petite diced tomatoes
13.5 oz can unsweetened coconut milk (the low fat version has no taste)
grated zest of one lime
1 1/2 - 2 lbs med/large raw (shelled) shrimp, firm white fish (cut into pieces about 1 1/2 inches square, or scallops (or any combination of the three)
3 T. freshly squeezed lime juice (from one large lime)
2 green onions, sliced
salt and pepper, to taste

Heat oil and saute shallots until tender, about 3 minutes. Add in ginger, turmeric, and cumin and saute for an additional minute. Stir in clam juice, diced tomatoes, coconut milk, lime zest, and shrimp, fish and/or scallops. Simmer until seafood is cooked, about 7 minutes. Stir in lime juice, green onions and salt and pepper, to taste. Serve. See how fast this is to make? You can do it! Makes 4 -6 servings.

Thanks for stopping by my kitchen today.  It's always so good to have you here!

Monday, February 22, 2010

Marmalade Cake

I looooooove marmalade.  Hated it as a kid.  Love it as a grown up.  My mom put a very expensive jar of marmalade in my stocking at Christmas (aren't Moms great?!).  I used some of that to make my first marmalade cake. It was a disaster, collapsing all over the plate when removed from the pan, but the crumbs were so delectable that I decided to give it another go and fix the recipe.  My second try at this cake was good, very orangey. Then I thought perhaps I had made the wrong guess about the recipe the first time, and decided to try it again. It was not better than my second try, and the second recipe used less process food and therefor had less chemicals in the cake. The second cake, my variation, was the winner and the one I am posting. 

I found the original recipe on Folgers.com it was called Orange Cake.  http://www.folgers.com/enjoy-coffee/dessert-recipes.aspx#orange_cake. I tried it because I had that very expensive marmalade, but the recipe was a problem from the beginning.  It didn't seem like there was enough butter to "cream" the butter and sugar until "light and fluffy". I followed the recipe anyway.  The second problem was the recipe called for a box of instant vanilla pudding, which I didn't notice at first and didn't specify what size box of instant pudding.  So in the middle of mixing the first cake, I went to the store for a box of instant vanilla pudding.  My store only carried the large size box, so I though, OK, instant pudding only comes in the large box, so I bought and used that. You know the end.  Disaster.  But a tasty disaster.  So I decided to adjust the recipe and find a real food substitute for the pudding.  A search of the Internet told me that was probably not a good idea because the recipe probably relied on the chemical thickening agents and such.  Arrrghhhhh!  I ended up adjusting the recipe anyway, adding some cornstarch and a more reasonable amount of butter.  Success!  I was going to post that recipe...until I found a small box of instant pudding at another grocery store.  Arghhhhhhhh!!  So I made the cake the third time, with my adjustments to the butter and the small box of pudding...no better than my second version. So here is the second version, no box of instant pudding required.

A few notes...the quality of the marmalade does affect the taste.  By the third cake I was out of the expensive stuff and used a cheapie store brand.  When you make this cake--and please make this cake, it's yummy--use the best quality marmalade you can get your hands on,

You'll thank me for this one--but I guess you should thank Folgers, too, who inspired this Marmalade Cake journey and this post.

Marmalade Cake

For Cake

3 cups flour
1/2 tsp. baking soda
1 tsp. baking powder
1/2 tsp. salt

1 cup butter, at room temperature
4 eggs
1 tsp. vanilla extract
1 tsp. orange extract
1/3 cup orange juice concentrate, at room temperature
3/4 cup buttermilk
1/3 cup Sweet Orange Marmalade

For Glaze 

1 cup powdered sugar
2 T. orange juice concentrate, at room temperature
2 T. Sweet Orange Marmalade
3 tsp. orange zest (usually from one orange)
1 tsp. vanilla

Preheat oven to 250 degrees.  Prepare a 12-cup Bundt pan. Mix dry ingredients together and set aside (flour, baking soda, baking powder, salt).  Using an electric mixer, beat butter for one minute and then add in sugar and beat for 3 or 4 minutes or until light and fluffy.  Add in eggs, one at a time, beating well after each addition.  After all eggs have been added, beat mixture for an additional minute, then beat in orange and vanilla extracts and the orange juice concentrate.  Beat in 1/3 of flour mixture, then 1/2 of the buttermilk, then 1/3 of the flour mixture, 1/2 of the buttermilk, and then the last 1/3 of the flour mixture.  Do not overbeat.  Fold in marmalade.  Pour batter into a prepared bundt pan. Bake in preheated 350 degree oven for 45 - 50 minutes or until cake is done.  Meanwhile, mix up glaze.  Beat all ingredients together until well combined.  When cake is done, remove from oven and cool in pan on a rack for 3-5 minutes.  Remove cake to a rack and brush on 1/3 of glaze mixture, letting it soak into cake.  After 10 minutes, brush on another 1/3 of glaze.  After 10 more minutes brush on remaining glaze.  Let cake cool completely on rack before serving.  Serve at room temperature.  I have had no problems keeping this cake under a glass dome on the kitchen counter for 3 -4 days.

MMmm...I think this is now one of my top five favorite cakes.  What's your favorite cake?


Lemon Curd Cupcakes Three Ways

Now that I have everyone making the easy microwave Lemon Curd, it's time to put it to good use!  I am not a huge fan of Martha, but sometimes she shows up in the right place at the right time with the right recipe, like she did this morning.  I made Martha Stewart's Lemon Cupcakes from her book "Cupcakes" (page 121).  Abby took 18 to college with her. I took 6 to a quilt group.  And there are still 12 here.  (Hint number one, make  half the recipe!) I think the squirt of lemon in the middle of the cupcake was a lot of fun.  Loved the frosting, too.  The cupcake was a bit dense, but a nice foil for the soft lemony center and sweet creamy top.  I'll make these again next time I have a batch of lemon curd on hand.

Lemon Curd Cupcakes
3 1/2 cups flour
2 T lemon zest (or a bit more,if you like a really lemony cupcake)
1/2 tsp. baking powder
1 tsp. salt
1 3/4 cups butter, at room temperature
3 cups sugar
8 oz. cream cheese, at room temperature
7 eggs, at room temperature
3 T freshly squeezed lemon juice (Martha only used 2)
1 tsp. vanilla

approx. 1 cup lemon curd
powdered sugar or buttercream frosting (recipe below)
toasted coconut, optional
yellow decorating sugar (optional)

Preheat oven to 325 degrees.  Line 36 - 42  cupcake tins with paper liners (Martha stated she made 42 cupcakes out of this batter, I was only able to make 36 ...).  In a medium bowl whisk together flour, lemon zest, baking powder and salt and set aside.  With an electric mixer beat softened butter for two minutes.  Add in sugar and beat for 3 minutes more. Beat in cream cheese.  Add in eggs, one at a time, beating well after each addition.  Beat in lemon juice an vanilla.  Add in flour mixture, beating until just combined.  Bake in preheated 325 degree oven for 28 to 30 minutes.  Cool cupcakes in tins on a rack.  When completely cool, fill and frost.

Place lemon curd in a ziplock bag.  Squeeze curd to the corner of the bag, and cut off about 1/8th inch of the plastic corner to make a "filling bag". With a knife, cut a small cylinder from the middle of each cupcake. Remove and discard the excess cake.  Fill the hole in the cupcake with lemon curd from the ziplock bag.  Sprinkle with powdered sugar or frost with buttercream frosting.

Buttercream Frosting

1 cup butter
3 cups powdered sugar
1 tsp. vanilla

With an electric mixer beat butter for two minutes.  Add in powdered sugar and beat for another three minutes.  Raise speed to high and beat for another two minutes or so. Beat in vanilla.

Spread frosting on desired number of cupcakes.  Sprinkle with toasted coconut or colored sugar if desired.

My favorite is the one with the buttercream frosting and toasted coconut.  What's yours?

Sunday, February 21, 2010

Microwave Lemon Curd (aka Lemon Loveliness)


Lemon Curd: (n) a wonderful treat cursed with an unfortunate name.  Don't be put off.  Lemon Curd is not curdled and there are no curds (nor whey).  So why the unfortunate name?  I just don't know.  Never mind, though, Lemon Curd is lovely; it's sort of a lemon jam. There's nothing better at the end of the day (or the beginning of the day, or the middle of the day for that matter) than a slice of hot toast with lemon curd, a cup of hot tea on the side, with feet up and something nice on the telly. Oh, yes there is, two slices of hot toast with lemon curd!  I picked 6 large lemons off of my neighbors tree this afternoon and whipped this up in the microwave. Enjoy Lemon Curd on your toast all week. Next weekend put some Lemon Curd in the middle of a layer cake, cupcakes, or cookies AND, I will post a recipe for a Pavlova with lemon curd and blueberries to finish off your batch. Leftover lemon curd will keep in the refrigerator for approximately three weeks.

I was reminded of this microwave recipe when I visited a few food blogs recently; 2 Stews and La Table de Nana.

Microwave Lemon Curd

1 cup sugar
3 whole eggs
1 cup freshly squeezed lemon juice (about 6 or 7 large lemons)
zest of 3 lemons (I used a microplane)
1/2 cup butter, melted

In a microwave safe bowl whisk together sugar and eggs until smooth. Sir in lemon juice, lemon zest, and melted butter.  Microwave for one minute, stir, microwave for another minute, stir.  Do this until the lemon curd is think enough to coat the back of a spoon.  This will take 5 - 7 minutes.  At this point can pour into small sterile jars to give as gifts, or cool, then cover and refrigerate for your family to use.  Store for up to three weeks in the refrigerator.


Thanks for visiting! Enjoy your Lemon Loveliness with your feet up, a cup of tea, and a good book.

Friday, February 19, 2010

Lemon Bundt Cake


It's the start of citrus season here in sunny California. Let's all celebrate with a homey, yummy Lemon Bundt Cake! I picked three lemons off my neighbor's tree (which I have spent 20 years training to grow over my fence) to make this cake. The cake is barely even yellow but it tastes quite lemony and has a softly dense texture. Look at the short list of ingredients. All good stuff! This is the sort of cake that has your family thinking, "Dang, no one makes cakes like Mom (or Dad)". I found this recipe in the book, "Under the Tuscan Sun" by Frances Mayes, so I have probably been making this cake since 1998 or 1999-with no end it sight-this is one of my favorite Bundt cakes.

Lemon Bundt Cake

For Cake
2 cups sugar
1 cup softened butter
3 eggs
3 cups flour
1 tsp. baking powder
1/4 tsp. salt
1 cup buttermilk (or milk, or cream, sour soured milk or cream)
3 T freshly squeezed lemon juice (don't use that stuff from the plastic lemon!)
4 tsp grated lemon zest (I use a microplane)

For Frosting

1/4 cup softened butter
1 1/2 cups powdered sugar
3 T. lemon juice

grated zest of one lemon (optional)

Preheat oven to 300 degrees. Prepare a 12-cup Bundt pan for baking. (Pam for Baking is great, so is using the wrappers from the butter cubes and then adding a small sprinkle of flour). Cream butter and sugar, beating until light and creamy, about 5 minutes total. Beat in eggs, one at a time, beating well after each addition. In another bowl combine flour, baking powder, and salt. Add 1/3 of the flour mixture to the butter mixture, then add 1/2 of the buttermilk, then 1/3 of the flour mixture, then 1/2 of the buttermilk, then 1/3 of the flour, beating after each addition. Add lemon juice and the grated zest to the cake batter, stir just to combine. Pour mixture into a prepared Bundt pan. Bake in preheated 300 degree oven for 50 - 70 minutes (original recipe said 50 minutes, but I always have to bake mine for 60-70 minutes). Remove cake from oven and let cool on a rack for a few minutes. Then invert cake and let cool completely on rack. When cake has cooled combine softened butter, powdered sugar, lemon juice, and optional zest. Casually glop the frosting on top of the cake, spreading to allow glaze to drip attractively down the sides. If desired, garnish cake top with curls of lemon rind.


Invite some friends over.  Have a nice little chat.  This cake is meant for casual sharing. Thanks for stopping by my kitchen today.  I'll put the kettle on in preparation for our next chat.

Monday, February 15, 2010

Hot Chocolate Lava Cakes


Look what my daughter Abby made for us for Valentine's Day! She printed off three recipes, tried two of them and here's the best. The cakes are easier to make than they look, and they can be mixed up a day or two ahead. How convenient is that? Thirty minutes before dessert, pop the desired number of cakes in a preheated oven and they'll be ready after dinner! The hardest part of making these cakes is getting the baking time just right. One minute too few, and the cake won't unmold properly, one minute too many and the center firms up. But follow the baking tip in the recipe and all should be OK. Oh, the other hardest part, finding the right sized ramekins, but having baked a dozen or more of these, it really doesn't matter. Use any size you think works for a single serving or a shared serving, and just adjust the baking time by watching for the small dome top.

Hot Chocolate Lava Cakes

6 oz. semi-sweet chocolate, chopped (the better the chocolate, the better the cake)
2 oz. unsweetened chocolate, chopped
6 oz. butter
4 1/2 tsp. cornstarch
1 1/4 cups sugar
4 eggs
4 egg yolks
2 tsp. vanilla

Generously grease ramekins with softened butter (Abby used eight 5 oz. ramekins). In the top of a double boiler combine both chopped chocolates and the butter. Over simmering water stir frequently until melted and combined. In another bowl stir together the cornstarch and sugar, then whisk in the melted chocolate mixture. Add in the whole eggs and the egg yolks plus the vanilla and whisk until smooth. Divide the batter between the prepared ramekins, cover with plastic wrap and refrigerate for at least six hours and up to three days. Preheat oven to 375 degrees. As the cakes bake, the edges will rise. As soon as the dimple in the center of each cake puffs up and sets, they’re ready. Leave the cakes in the oven any longer, and the centers will bake through and no longer be molten. Bake the cakes for 24 to 26 minutes or until the center top "domes" and middle is just set.


Remove ramekins from oven and let sit undisturbed for 5 minutes. To unmold, place a dessert plate on top of the ramekin and another plate under the ramekin. Using hot pads, invert the ramekin onto the dessert plate. Sprinkle with powdered sugar. Serve with or without a dollop of whipped cream or ice-cream and a few fresh raspberries. Makes approx 8 servings.

This recipe was found at Hungry Cravings.

Thanks for stopping by the kitchen today.  (Isn't Abby the greatest?!)


S'mores Bars

I have been looking for a recipe for S'mores Bars since they started showing up in bakery cases a few years ago.  I guess the idea of moving S'mores from the campfire to a bar started with the boxed granola bar.  The mass product manufacturers didn't get it right though. Eating a boxed S'more granola bar is like eating textured, scented cardboard. S'mores Bars in bakery cases don't fare too well either.  The usual recipe seems to be overly sweet chocolate brownies with marshmallows and graham cracker crumbs on the top.  But I have the right recipe now!  The bottom is 2 parts graham crackers to one part chocolate.  Perfect ratio, right?  The graham crackers and chocolate are held together with sweetened goodness and there are sticky, gooey, melted marshmallows on top.  The right flavor. The right texture.  The right stickiness. I wasn't a girl scout for 17 years for nothing!

The inspiration for this recipe came from The Taste of Home "Cookies...623 Irresistable Delights".  Page 217 has a Graham Cracker Brownie recipe attributed to Cathy Guffey from PA.  I just the marshmallows and gave the bars a more appropriate name.

I am thinking I need to double this recipe next time and make it in an 13 x 11 inch pan.

S'mores Bars

2 cups crushed graham crackers (1 cellophane wrapped package)
1 cup semi-sweet chocolate chips
1 tsp. baking powder
pinch of salt
1 14 oz. can sweetened condensed milk
2 cups miniature marshmallows

Preheat oven to 350 degrees.  Butter an 8x8 inch baking pan. Crush the graham crackers by whacking them in the package. I use a meat mallet, but the back of a soup ladle, measuring cup, or small pan will also work--don't make really fine crumbs, though.  Leave some big pieces.  Put the (large)crumbs in a mixing bowl, add the chocolate chips, baking powder and salt and combine.  Stir in the sweetened condensed milk.  Spread mixture into an 8x8 inch baking pan. Bake in preheated 350 degree oven for 30 minutes.  Take out of oven and sprinkle miniature marshmallows over the top.
Return pan to oven for 4-5 minutes to melt marshmallows.  Remove pan from oven and quickly spread melting marshmallows smoothly over the top with an offset spatula.
Let bars cool completely. Now comes the hard part, cutting the bars.  I find it a bit easier to use a warmed knife for each cut...but it is still a sticky job, which makes them true S'mores Bars!.  Cut into 16 bars.

How many girl scouts, former and current, stopped by my kitchen today?  Do you think you'll try these?


Sunday, February 14, 2010

Fish Tacos


I was there when fish tacos migrated across the border from Baja California to San Diego, California. I know what a fish taco is supposed to be. No mango salsa! No salsa at all, in fact. And, never, ever, under any circumstances batter fried fish! Shame on whomever put a piece of fried fish in a tortilla (I'm guessing it was a fast food chain restaurant). The fish is supposed to be grilled; seasoned and grilled and served on warm corn tortillas. Not flour tortillas. Not crispy tortilla shells. A warm corn tortilla folded in half to encase grilled fish, coleslaw (yes, coleslaw) a squeeze of fresh lime, and a garnish of cilantro, diced fresh chilies, and onion.

That all being said, last summer Bon Appetite published a recipe for "Baja Fish Tacos". They didn't get the recipe quite right BUT the fish marinade was good and the lime enhanced sour cream was to die for. So here is my recipe for Fish Tacos, I can't call them authentic any more because of the lime sour cream, but they do have coleslaw, grilled fish, corn tortillas, lime, cilantro, chilies and onion.

I can't wait for Cinco de Mayo when I plan on making these again.

Authentic Fish Tacos

2 lbs of firm white fish (Halibut, Cod, Mahi-mahi...)
8 corn tortillas (or 16, fish tacos used to be composed of two folded corn tortillas, but I find one to be sufficient)

For Marinade

1/3 cup veg. oil
3 T. lime juice
2 T. chili powder
2 tsp. ground cumin
2 tsp. ground coriander
2 tsp. minced garlic
1 tsp. Kosher salt (or 1/2 tsp. table salt)

For Coleslaw

2 -3 cups shredded green cabbage (use 1 cup red cabbage if you have it)
1 large carrot, grated
1-2 stalks celery, chopped

For Coleslaw dressing

1/4 cup mayonnaise
1 T. sugar
1 T. apple cider vinegar

For Lime-Sour Cream

1/2 cup sour cream
2 tsp. lime zest (from two limes)
2 tsp. lime juice

For Garnish

1/2 bunch chopped cilantro
1 diced fresh green chili
1/4 cup diced onion


First make coleslaw and set aside for flavors to meld. Combine mayonnaise, sugar and apple cider vinegar. Whisk to combine and to dissolve any lumps. In another bowl combine cabbage, carrot, and celery. Pour dressing over cabbage mixture and set aside for flavors to meld. Second, marinate fish. Cut fish into thick slices that will fit comfortably into a folded corn tortilla. Combine marinade ingredients and then pour over cut fish. Marinate fish pieces for 30 minutes. Third, make Lime Sour Cream. Combine sour cream (I use non-fat), lime zest and lime juice, stirring to mix well. Four, make garnish...being a gringo wimp, I just garnish with cilantro...but for guests I combine cilantro with chopped onions and chilies. Five, remove fish from marinade and broil, grill, or pan fry. Cook just until fish is white and flakes easily with a fork (about 5 -7, minutes total...but cooking time depends on the thickness of fish and the intensity of the heat). Six, heat corn tortillas on grill or in a dry frying pan (about 1 minute on each side). Done! Combine tacos in kitchen, or provide bowls of each component and allow diners to assemble their own fish tacos at the table.

To assemble: place a piece of fish in the middle of the warm tortilla. Next to that, place a scoop of coleslaw. Drizzle some lime sour cream over fish and sprinkle with desired garnish. Fold, and eat, this could get messy. Have plenty of napkins on hand. Heaven.

Thanks for visiting.  Enjoy your Fish Tacos... Now, what's for dessert?  Flan?

Wednesday, February 10, 2010

Coffee Kissed Salmon


It's a marriage made in heaven. Even coffee haters will appreciate this pairing.  The baked salmon tastes a bit smokey, and bit cedar-y, not at all like coffee.  This is an easy, healthy, entree to put on the table after a long day, and an easy company-pleasing entree to put on the table during a busy weekend.  It can't get much easier, actually.  Just make sure you have some good quality salmon steaks on hand. Then rub them, bake them, and enjoy.


Coffee Kissed Salmon

For each pair of salmon fillets (each about 6 oz)

1 T. ground cumin
1 T. chili powder
1 T. brown sugar
1 T. ground coffee (not instant, use fresh coffee grounds-not used!-any kind, caffeinated or decaffeinated, it doesn't matter)
1/2 tsp. Kosher salt
1/4 tsp freshly ground black pepper

Combine all ingredients cumin, chili powder, brown sugar, ground coffee, salt and pepper in a small bowl and then rub mixture all over the salmon fillets.  Set fillets aside to rest, 10-20 minutes.  Preheat oven to 400 degrees. Drizzle a little bit of olive oil over the salmon, and lightly brush oil evenly over the fillet without disturbing the rub.  Bake fillets in hot oven until fish is cooked (internal temp of 140 degrees), which usually takes 10-12 minutes but depends upon the thickness of the fillets.

This recipe was found in the comments of Facebook's Epicurious Fan page, under a post from October 22, 2009, titled 'Our Favorite Cooking with Coffee Recipes'. It is attributed to Rebecca Chanin of WiseChoice, Your Personal Path to College.

Thanks for stopping by my kitchen today!  Try this salmon soon, it will become one of your staples. I am sure of it!

Tuesday, February 9, 2010

Nanaimo Bars (for the Winter Olympics)


What makes my pulse race, my heart surge and my eyes well up? The Olympic theme music. "Neither snow, nor rain, nor heat nor gloom of night"..., will keep me from the opening ceremonies, closing ceremonies and the two weeks of coverage in between. It's only right that the games be celebrated with one of Vancouver's celebrated foods, Nanaimo Bars. Truth-be-told, I find Nanaimo Bars to be a bit sweet, but being an Olympic Patriot, I'm sticking by them! Fudge is sweet, and we all like fudge right? So cut these bars into fudge sized squares and all will be OK. If you want to know more about Nanaimo bars, follow this link to the city of Nanaimo. I DID changed it a bit, of course :) See you at the games!

Nanaimo Bars

Bottom Layer- A Nutty Chocolate, Coconut Base

½ cup butter
¼ cup sugar
1/3 cup cocoa powder
1 egg beaten
2 cups graham cracker crumbs
½ c. finely chopped almonds, pecans or walnuts
1 cup shredded sweetened coconut
1 tsp. vanilla

Melt first 3 ingredients in top of double boiler (Do it in the double boiler, I did my first batch without a double boiler, and I had a curdled mess after I added the egg) Add a T or so of chocolate mixture to beaten egg, and then another T. Turn heat off the double boiler. Pour warmed egg mixture into the chocolate mixture in the top of the double boiler. Stir vigorously to cook and thicken. Remove pan from bowl from double boiler and then stir in graham cracker crumbs, coconut, nuts and vanilla. Spread mixture into the bottom of a greased 9" x 9" pan. Refrigerate bottom layer while preparing the middle layer.

Second Layer-The Sweet, Firm, Cream Filling

½ cup butter
2 Tbsp. and 2 tsp. cream
2 Tbsp. vanilla custard powder (Bird's Custard Powder preferred, Instant Vanilla Pudding powder if you don't know what Bird's is or where to get it)
2 cups powdered sugar
1/2 tsp. vanilla
pinch of salt

Cream butter, cream, custard powder, powdered sugar, vanilla and salt together. Beat until the mixture is very light, about 5 minutes with an electric mixer. Spread filing over the bottom layer and refrigerate while preparing the top layer.

Top Layer-Solid Chocolate

8 oz good quality semi-sweet chocolate chips
2 Tbsp. butter

Melt chocolate and butter together on 50% power in microwave. Cool slightly. Once cool, but still liquid, pour over second layer, spread evenly and then and chill in refrigerator until firm.

To cut the squares without cracking the hardened chocolate, use a sharp knife that has been warmed slightly before each cut. (Dip knife in boiling water, then quickly dry off before making a cut). Then use a small spatula to remove the squares from the pan. Keep squares refrigerated until serving time. Cue the Olympic Theme music!

Note: I have heard of two other places these are served; New York, as New York Slices, and Alaska, as Yukon Bars.

Thanks for visiting!  Now go watch the Olympics..., with a Nanaimo Bar!

Monday, February 8, 2010

Crumbly Topped Banana Muffins


I bought a bag of over-ripe bananas about a week ago. They weren't that ripe at the time. I was going to make banana cream pie with them, but then all the kids left and there was no one here to eat banana cream pie, except me, and I am having a hard enough time fitting into my pants as it is. Then banana bag ripped and rapidly blackening bananas cascaded over my counter space. There was nothing to do but start baking. I started on banana muffins last night, two kinds. These crumbly topped ones are delicious, and they are still moist and yummy the morning-after. In fact, they are so good that I just dropped off half a dozen at my doctor's office... I've got my fingers crossed that there will be a rapid return on my investment...

Crumbly Topped Banana Muffins

For Muffin
1 1/2 cups flour
1/4 tsp. nutmeg
1 tsp. baking soda
1 tsp. baking powder
1/2 tsp. salt
1 1/2 cups of mashed banana (that was only 3 of the ones on my counter...)
3/4 cup white sugar
1 egg
1/3 cup veg. or canola oil or melted butter

For Topping
1/3 cup packed light brown sugar
2 T. flour
1/4 tsp. cinnamon
1 T. melted butter

Preheat oven to 375 degrees. Line 10 muffins cups with paper liners. In a medium bowl whisk together flour, nutmeg, baking soda, baking powder and salt and set aside. In another bowl mix together mashed bananas, sugar, egg, and oil or melted butter. Stir the banana mixture into the flour mixture. Do not beat, stir just until flour is moistened. Spoon batter into muffin cups. In another bowl combine the brown sugar, flour, cinnamon, and melted butter. Stir and mash with a fork until small crumbles form. Sprinkle the crumble topping over the batter in the muffin cups. Bake at 375 degrees for 18 to 20 minutes.

Yes, you should definitely make these. Thanks for stopping by!

Saturday, February 6, 2010

Chocolate Chip Cookies with Four Variations


My recipe for Chocolate Chip cookies..., the only one I've used since 1981.  I haven't even looked at another chocolate chip cookie recipe since then. This recipe makes a straight-up chocolate chip cookie; nothing fancy, just pure goodness. The ingredients are butter, sugar, chocolate, and flour with a leavening agent and some eggs thrown in. No spices. The cookie is not cakey.  It's not crisp. It's slightly crunchy around the edges, slightly chewy in the middle, and melt-in-your-mouth delicious.  Like I said, pure goodness!   This recipe doesn't fool around either.  You start with a pound of butter and end up with about 6 dozen good sized cookies. (They freeze well.  They travel well, too.  My son in college is getting 3 dozen by US Mail for Valentine's Day.  Shhhh.  Don't tell him :)

Pure Goodness Chocolate Chip Cookies

1 lb. salted butter, at room temperature (there is no other salt in the recipe, so don't use unsalted butter)
1 1/2 cups white sugar
2 cups light brown sugar
3 eggs
2 T. vanilla extract
6 cups flour
2 tsp. baking soda
2 tsp. baking powder
12 oz (about 4 cups) chocolate chips (semi sweet is usual choice, but some people prefer milk chocolate, or a combination)
2 cups chopped nuts (optional)

Preheat oven to 350 degrees. Combine flour, baking soda, and baking powder in a small bowl.  Beat with a whisk to aerate then set aside. In another bowl beat butter with an electric mixer for about 30 seconds, add in white sugar and beat for 2 minutes, then add in brown sugar and beat for 3 additional minutes or until light and fluffy.  Slowly beat in the eggs, one at a time, beating well after each addition.  Gradually add in flour mixture to creamed egg-butter mixture.  Once the flour has been incorporated stir in 12 oz (about 4 cups) chocolate chips. Scoop about 1 T of dough for each cookie and place onto ungreased or parchment lined cookie sheets.  For a more refined looking cookie, roll the balls and then flatten slightly with the heel of your palm.  Bake in 350 degree oven for 10 - 12 minutes.  I bake mine, in my current oven, for 11 minutes, which means I take them out of the oven when they still look a smidgen-and I mean a smidgen-undercooked.  Cookies firm up on cooling.  Cool on trays for a few minutes, then remove to a rack to cool completely. Makes approx. 6 dozen good sized cookies.

Chocolate Raisin Cookies I love chocolate covered raisins, and Chocolate Raisin cookies are one of my all-time favorites.  Omit the nuts, and use 3 cups chocolate chips (semi sweet or milk) and 3 cups raisins. YUM.

Mixed Chip Cookies  My daughter Abby uses 1 cup butterscotch chips, 1 cup white chocolate chips, 1 cup milk chocolate chips, and 1 cup semi-sweet chocolate chips. In high school, she was famous for her chocolate chip cookies. She rolls the cookies in nice neat balls, flattens them, and then tops them with one of each kind of chip...to die for!

M&M Cookies  Mix in 2-3 cups of the chocolate chips, roll dough into balls, flatten a bit, then press 3-5 M&Ms (depending on the size of the ball) into the top of each cookie.  The M&Ms can be color coordinated to the holiday...red and green M&Ms for Christmas; pink, red and White for Valentine's Day; orange, purple and black for Halloween; pastels for Easter...

Peppermint Chocolate Chip Cookies  For Christmas, of course.  In place of nuts stir in 2 cups coarsely crushed candy canes.  Be sure to bake on parchment covered cookie sheets.

Thanks for stopping by!  What variation is calling out to you?

Friday, February 5, 2010

Swedish Butter Cookies Three Ways


The weekend is upon us and it sounds as if it's going to be cold and wet almost everywhere. Let's make cookies!  Here is my favorite recipe for butter cookies. It's an easy one, and the cookies are melt-in-your-mouth delicious.  I have been baking these cookies exactly as the recipe specifies since the mid-1980s when my friend Kathy gave me the recipe (which she acquired from one of her students).  Just a few days ago, emboldened by all the foodie pages I have been looking at, I decided to play with the recipe a bit.  What fun!  One version, adding lemon peel, was only so-so, but the other two were excellent.  Now I am anxious to create a coffee/latte version. If I get one to work, you can be sure I'll post if it.  Let me know if you come up with any winning variations..., but don't miss the originals, they are to die for!

Swedish Butter Cookies

1/2 cup butter, at room temperature
1/2 cup sugar
1 tsp. corn syrup
1/2 tsp. baking soda
1 cup flour

Preheat oven to 300 degrees. Beat butter and sugar and corn syrup together with an electric mixer for about 3 minutes.  Stir in flour and baking soda.  Divide dough into 4 equal parts.  Roll each part into a roll about 6 inches long and 1 inch thick.  Place on a cookie sheet.  Cookies will spread a lot, so space them equidistantly. Bake in preheated 300 degree oven for 20 - 25 minutes.  Cut bars, at an angle, into slices while still hot.  I cut off the rounded ends, then slice each roll into 6 slices to make 2 dozen cookies per batch.  Cool on paper towel.


Coconut Butter Cookies (my favorite version)
Mix dough as above, adding in 1/2 tsp coconut extract with corn syrup.  Cover each roll with 1/2 to 1/3 cup sweetened shredded coconut.  Press coconut on roll, slightly flattening the rolls in the process.


Nutty Butter Cookies
Substitute 1/3 cup brown sugar for the 1/2 cup of white sugar.  Stir in 1/2 cup finely chopped almonds with flour.  Partially flatten the rolls before baking (with nuts, the dough doesn't spread as much). Bake at 325 degrees for 20 - 25 minutes.

Lemon Butter Cookies
If you want to try it, I just added the grated rind of 1 large lemon... But the results weren't nearly as tasty as the original version.  You simply have to make the originals!

What do you think?  Are you going to try this?
Whatever you decide, thanks for stopping by,